In the last tutorial, we created a special menu for our game's title screen, from which the player can start the game. However, the game becomes paused when this menu is enabled. It would be better to let the game run unpaused during this time - so that we can add some nice animation effects to the scene.
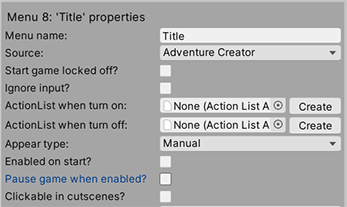
To prevent the Title menu from pausing the game, we can simply uncheck the Pause game when enabled? option in the menu's list of properties.
Then, make the same change to both the Options and Load menus, since they can also be accessed from the title screen.
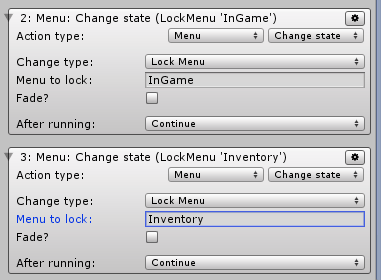
Notice, though, that any menu that's set to display during normal gameplay will now also be visible - such as the Inventory and InGame menus in the 3D Demo. We will have to temporarily lock these menus off. Go back to your scene's OnStart Cutscene, and add a Menu: Change state for each menu you wish to lock:
We will also need to unlock these menus when the player clicks the New game button. Select the Begin new game ActionList asset, and add Actions that unlock each menu. Be sure to stack them before the Scene: Switch Action - otherwise they will not be run.

But, now have a bigger problem: we want regular gameplay to freeze when the Options and Load menus are enabled. While we could create duplicates of these two menus especially for the title screen, a nicer trick is to use a "hidden" menu that will pause the game whenever we wish.
Still in the Menu Manager, click Create new menu, and set the new menu's name to Freeze. Check Pause game when enabled?, and - importantly - Ignore input?. This will ensure that the player can't inadvertently click on it.
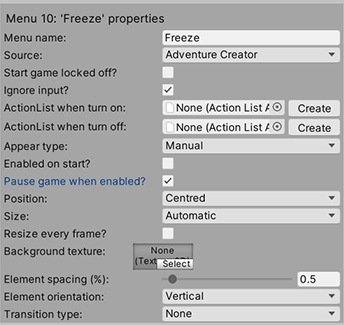
If we add no elements, and leave the menu's Background texture blank, the menu will be invisible - it's purpose will simply be to freeze gameplay. Since our game will still freeze when our regular Pause menu is on, we only need to enable this menu when our Options and Load menus are enabled - unless the scene is TitleScreen.
We'll create an ActionList that will enable this Freeze menu if appropriate. Create a new ActionList asset, and name it Enter sub menu. This will require a "check" Action, so view the asset in the ActionList Editor window.
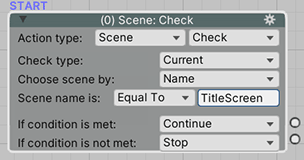
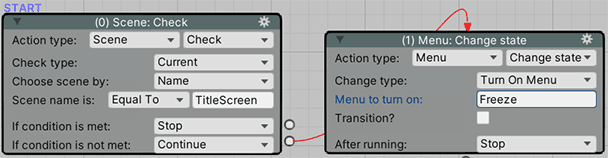
Change the default Action to Scene: Check, and set it to check the same scene as we did in the Exit sub menu asset in the previous tutorial. Here, we're checking to see if we're in the TitleScreen scene:
We want to enable the Freeze menu if we aren't in the scene, so drag a wire from the If condition is not met socket to create a new Action. If the other socket automatically attaches itself to the new Action, just change the popup to Stop. Set the new Action's type to Menu: Change state, and set it up to turn on the menu Freeze.
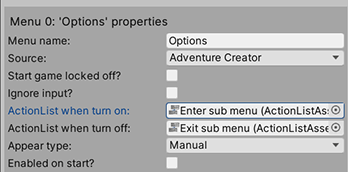
We want this ActionList to run when either the Options or Load menus are turned on. We can do this by assigning this asset to the ActionList when turn on field of each menu.
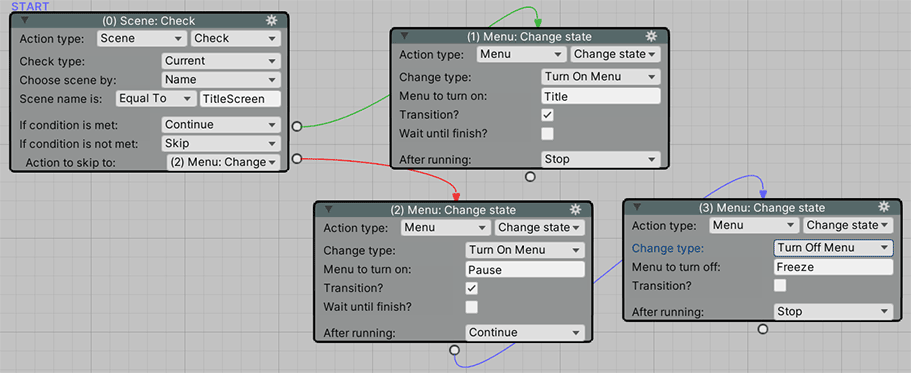
We will also need to amend the Exit sub menu asset to disable our Freeze menu again. Select the asset, and add an Action that does this after the Pause menu is turned on:
Our game will now be frozen if the Options or Load menus are enabled during normal gameplay, but unfrozen during the title screen.