Futher examples of custom motion controllers can be found in the Integrations page of the AC community wiki here.
While Adventure Creator provides multiple built-in options for character motion, it’s also possible to move characters through your own means - whether through custom scripts, or with one of the many controller assets on the Unity Asset Store. Adventure Creator makes the process of integrating an external controller as simple as possible by providing a number of useful script functions.
In this tutorial, we'll create a "bridge script" that allows AC to work in conjunction with Third Person Motion Controller, by Ootii. We'll allow our AC characters (both Players and NPCs) to move with TPMC, while still being able to use AC's point and click system, as well its Character: Move to point Action.
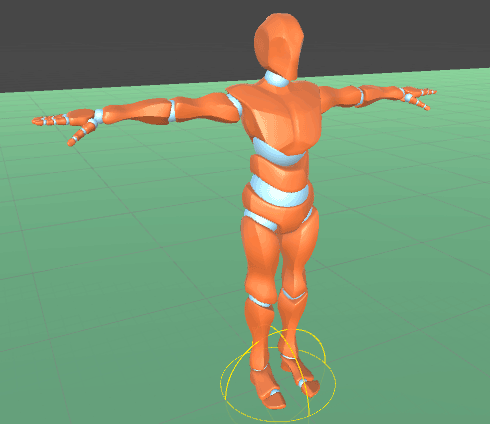
The first step is to give our character the scripts necessary for both Adventure Creator and Motion Controller. Which way around you will want to do this will depend on the asset involved, but here we’ll begin with a Motion Controller-ready player and convert it to Adventure Creator. The PlayerBot GameObject in Motion Controller’s included demo_NavMesh scene is such a player:
Add two scripts to his Inspector: Player (or NPC) and Paths. These two are the minimum Adventure Creator needs to work:

Be sure to also tag his GameObject as Player, if he is an AC Player character.
At the top of AC's Player/NPC component, you can see fields for both the Animation engine and Motion control:
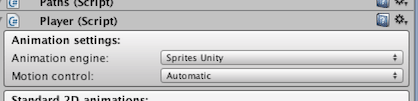
As Motion Controller will override both the animation and motion systems, we'll want to set these to Custom and Manual respectively.
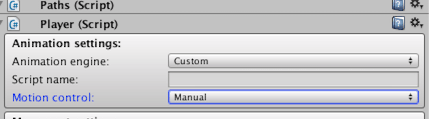
Notice how the Movement settings box just below shrinks down to reflect how we are now overriding AC's control over th character’s motion.
This character also has a NavMesh Agent, as well NavMesh Input Source component. We'll write a simple custom script that sets the NavMesh Agent's target to whatever AC tells it to be.
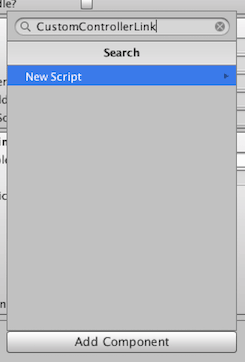
Create a new C# script named CustomControllerLink, and use the Add Component button at the bottom of the Inspector to create and add a script with this name.
Open the script up for editing. Both Adventure Creator and Motion Controller use their own scripting namespaces, so we’ll need to include these in the header:
using UnityEngine;
using System.Collections;
using com.ootii.Input;
using com.ootii.Actors.AnimationControllers;
using AC;
We now want to create two script variables, to reference the attached AC Char script (which is a base class of both Player and NPC) as well as the NavMeshInputSource script.
public class CustomControllerLink : MonoBehaviour
{
	private NavMeshInputSource navMeshInputSource;
	private MotionController motionController;
	private Char acCharacter;
Next, we want to assign these variables as appropriate, so they can be referenced later. Do this in the Start function: function:
private void Start ()
{
	navMeshInputSource = GetComponent <NavMeshInputSource>();
	motionController = GetComponent <MotionController>();
	acCharacter = GetComponent <Char>();
}
Our integration will basically boil down to setting the NavMeshInputSource's TargetPosition Vector3 to the Char script's GetTargetPosition Vector3. We can do this in the Update function:
private void Update ()
{
	navMeshInputSource.TargetPosition = acCharacter.GetTargetPosition (true);
}
The GetTargetPosition's "true" parameter returns the final destination, as opposed to the next node in their path.
Optionally: If we want to not run during gameplay for Players that are not under point-and-click control, we can wrap this around the following checks:
public UnityInputSource unityInputSource;
private void Update ()
{
	if (!KickStarter.stateHandler.IsInGameplay () || (!acCharacter.IsPlayer || KickStarter.settingsManager.movementMethod == MovementMethod.PointAndClick) || acCharacter.IsMovingAlongPath ())
	{
		navMeshInputSource.TargetPosition = acCharacter.GetTargetPosition (true);
		motionController.InputSource = navMeshInputSource;
	}
	else
	{
		motionController.InputSource = unityInputSource;
	}
}
Doing this allows us to extend this script in this instance, to e.g. switch between direct control during gameplay. The "Unity Input Source" Inspector field should be set to a separate "Unity Input Source" component used to handle the direct input. The Motion Controller component's Input Source will then be dynamically set to either the NavMesh Input Source or the Unity Input Source based on its needs at any time.
The complete script is as follows:
using UnityEngine;
using System.Collections;
using com.ootii.Input;
using com.ootii.Actors.AnimationControllers;
using AC;

public class CustomControllerLink : MonoBehaviour
{

	private NavMeshInputSource navMeshInputSource;
	public UnityInputSource unityInputSource;
	private MotionController motionController;
	private Char acCharacter;


	private void Start ()
	{
		navMeshInputSource = GetComponent <NavMeshInputSource>();
		motionController = GetComponent <MotionController>();
		acCharacter = GetComponent <Char>();
	}


	private void Update ()
	{
		if (!KickStarter.stateHandler.IsInGameplay () ||
		(!acCharacter.IsPlayer || KickStarter.settingsManager.movementMethod == MovementMethod.PointAndClick)
		|| acCharacter.IsMovingAlongPath ())
		{
			navMeshInputSource.TargetPosition = acCharacter.GetTargetPosition (true);
			motionController.InputSource = navMeshInputSource;
		}
		else
		{
			motionController.InputSource = unityInputSource;
		}
	}
}
Finally, make sure AC's Movement method is set to Point And Click, and that the scene is set up to use Unity Navigation pathfinding. In the demo_NavMesh scene, this is a case of placing the Ground object on the NavMesh layer, and setting the Scene Manager's Pathfinding method to Unity Navigation.
Adventure Creator and Motion Controller can now work together. If you want to go deeper with custom scripting, or make use of another controller asset, the following functions and variables are available in the Char script:
- Vector3 GetTargetPosition () - Returns the character’s intended position
- Quaternion GetTargetRotation () - Returns the character’s intended rotation
- Quaternion GetTargetSpeed () - Returns the character’s intended speed
- bool isTalking - True if the character is talking