Being able to examine objects up-close, by rotating them in 3D, is a common ability in modern adventures like Gone Home. This tutorial will cover a couple of ways you can make use of AC's draggable system to achieve this.
Both techniques, however, need the following preparation:
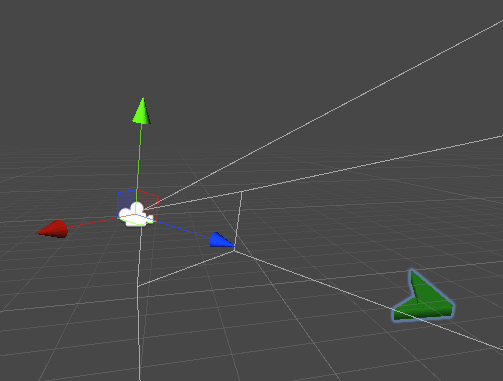
Begin by adding a Marker to the scene, and parenting it to the MainCamera. Name it HeldItemMarker, and position it a short distance in front of the camera. This will represent the location of any object currently being examined:
Next, add a Constant ID component to this Marker, and check Retain in prefab?. Then make this MainCamera + Marker a new prefab. When creating new scenes, you can now use this MainCamera instead of the default provided - so that the technique works in any scene.
Now we'll prepare the object we want to examine. With a prepared model (in this case, we're using a shield - but anything will do), place it somewhere appropriate in the scene:
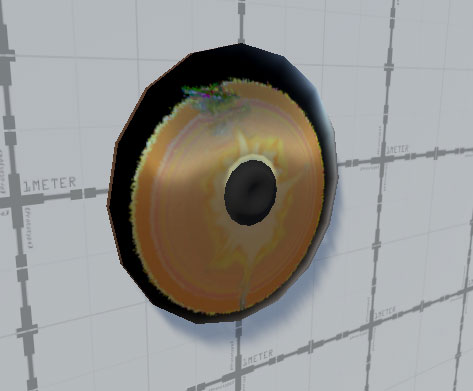
Select the object and attach an appropriate Collider. In this case, a convex Mesh Collider is best. A Rigidbody is optional, but not required.
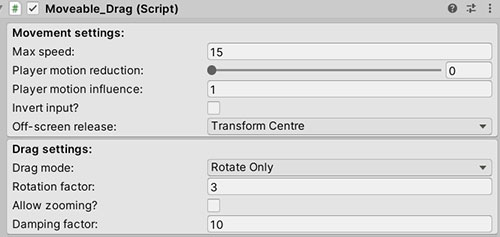
Next, attach a Moveable_Drag component. We can use this instead of the dedicated PickUp component, because we won't be moving it around - only turning it.
In this component's Inspector, set the Drag mode to Rotate Only. A Max speed of 15, Rotation factor of 3, and Damping factor of 10, are recommended as well - but you can tweak this to get the right kind of behaviour you want.
We now have an object that can be rotated when a mouse click is held and dragged over it. However, it will remain in place while doing so - while we instead want it to appear directly in front of us. We'll now cover two techniques to achieve this:
Technique 1: Simple repositioning
With a simple script, we can have the object reposition itself in front of the camera while it's held - and then return to its original position when released.
ReturnPickUp.cs:
using UnityEngine;
using System.Collections;
using AC;

public class ReturnPickUp : MonoBehaviour
{

	public Marker markerWhenHeld;
	public float moveSpeed = 10f;

	private Vector3 originalPosition;
	private Quaternion originalRotation;
	private bool doReturn;
	private bool isHeld;
	private DragBase dragBase;

	private LerpUtils.Vector3Lerp positionLerp = new LerpUtils.Vector3Lerp();
	private LerpUtils.QuaternionLerp rotationLerp = new LerpUtils.QuaternionLerp();

	private void OnEnable ()
	{
		dragBase = (DragBase) GetComponent<DragBase>();

		EventManager.OnGrabMoveable += GrabMoveable;
		EventManager.OnDropMoveable += DropMoveable;
	}

	private void OnDisable ()
	{
		EventManager.OnGrabMoveable -= GrabMoveable;
		EventManager.OnDropMoveable -= DropMoveable;
	}

	private void Update()
	{
		if (doReturn)
		{
			transform.position = positionLerp.Update (transform.position, originalPosition, moveSpeed);
			transform.rotation = rotationLerp.Update (transform.rotation, originalRotation, moveSpeed);
		}
		else if (isHeld && markerWhenHeld != null)
		{
			transform.position = positionLerp.Update (transform.position, markerWhenHeld.transform.position, moveSpeed);
		}
	}

	private void GrabMoveable (DragBase _dragBase)
	{
		if (_dragBase == dragBase)
		{
			originalPosition = transform.position;
			originalRotation = transform.rotation;
			doReturn = false;
			isHeld = true;
		}
	}

	private void DropMoveable (DragBase _dragBase)
	{
		if (_dragBase == dragBase)
		{
			doReturn = true;
			isHeld = false;
			if (moveSpeed <= 0f)
			{
				transform.position = originalPosition;
				transform.rotation = originalRotation;
			}
		}
	}

}
Copy/paste this script into your project, and then attach it to the object we want to examine. In its Inspector, assign the MainCamera's HeldItemMarker child as the Marker When Held field.

And that's it! The item will now move towards the camera when held, and return when released.
Technique 2: Toggling an 'Examine mode' on and off
A more advanced method - but one that doesn't rely on scripting - is to create a dedicated 'Examine mode' that we enter upon clicking an item. We can then drag the item around as we like, before clicking a dedicated button to exit this mode and return to regular gameplay. We'll make use of assets and prefabs, so that the logic can be easily re-used on any item we like.
To start with, we'll create the 'Exit' button - which will be in a new Menu that appears while we're in this new mode. In the Menu Manager, create a new Menu named ExamineMode. Set its Appear type to During Gameplay, and check Start game locked off:
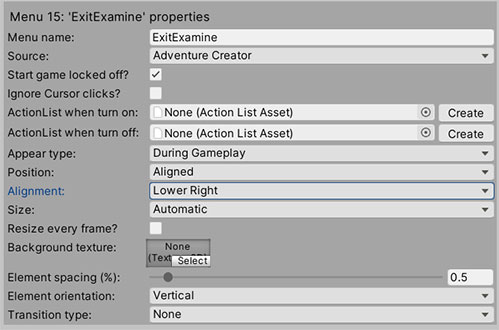
In this new menu, create a new Button element. You can style this menu to however you like, but here we're just positioning in the lower-right corner of the screen:
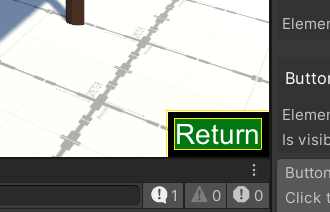
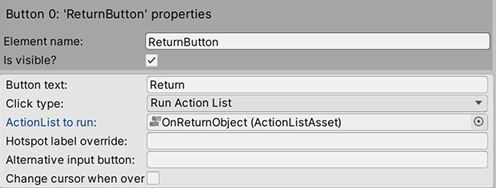
Set its Button text to Return, and set its Click type to Run ActionList. Create and assign a new ActionList asset, and name it OnReturnObject:
Leave this ActionList alone for now - we'll come back to it later. Next, go back to the scene and add a new Hotspot - and place it at the same position as the object we'll be examining.
Then, parent the object you want to examine to this Hotspot - so that the examining object has a local position and rotation of (0,0,0). Then place the examining object on the Ignore Raycast layer so that it is inactive by default.
Update the Hotspot's collider to fit the object, and it should look something like this:

This technique will work by having clicks to the Hotspot activate "Examine mode". This will involve four steps:
- Turning on the Moveable_Drag component
- Positioning the object we're examining in front of the camera
- Displaying the 'Examine mode' menu we just made
- Preventing the player from interacting with anything else, saving, and moving
Because we'll want to perform the same steps for different objects, we'll perform them in an ActionList asset file, and rely on ActionList parameters to set field values at runtime.
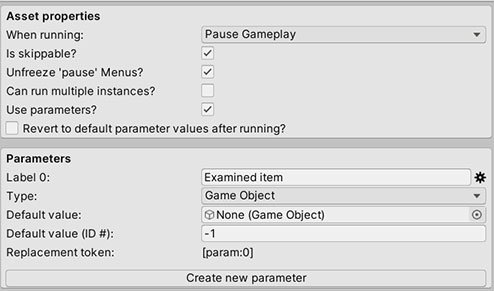
Create a new ActionList asset file named OnExamineObject. In it's Properties panel, define a Parameter of type Game Object and named Examined Item:
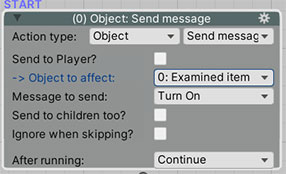
Set the ActionList's first Action to Object: Send message Action. Override its Object to affect field with the Examined Item parameter, and set the Message to send to Turn On:
Next, create an Object: Transform Action. Again, override the Moveable object field with Examined Item. Set the method beneath to Copy Marker, and assign the MainCamera's HeldItemMarker child in the Marker field. Check Act in world-space?, and set the transition settings as appropriate:
![]()
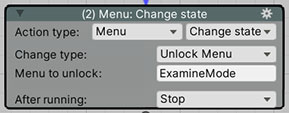
The third Action will be a Menu: Change state Action that unlocks the ExamineMode menu we created earlier. Since this menu is set to appear during gameplay, unlocking it will cause it to display once the ActionList ends:
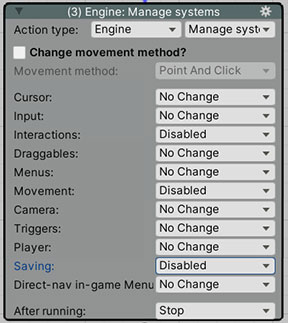
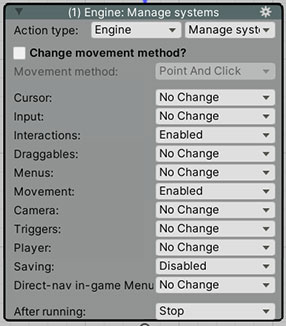
Finally (for the moment), add an Engine: Manage systems Action. Use it to disable the Interactions, Movement and Saving systems:
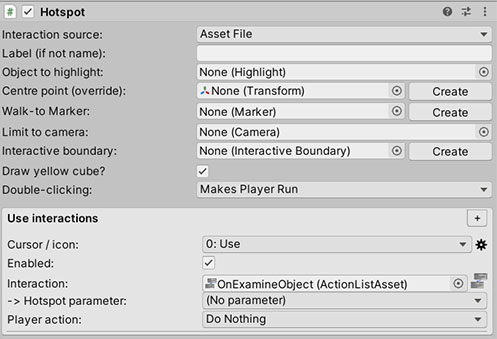
To have this ActionList run when the Hotspot is clicked, set the Hotspot's Interaction source to Asset File, and then create a new Use interaction. Set the Interaction to the asset, OnExamineObject
From here, we can optionally map the Hotspot to the Examined Item parameter - but we instead want to map this to the child object. To do that, we'll need to make use of a separate component - Set Interaction parameters.
Attach this component underneath the Hotspot. It should, by default, recognise that the Hotspot's Use interaction makes use of parameters. Here is where we can properly set the Examined Item parameter to the child object we wish to examine:

If we now run the game, we'll find that clicking the Hotspot causes the object to move in front of us as we enter 'Examine mode'. However, althoough saving is currently prevented - we'll need to make sure this gets reset when we load a save file made earlier.
To do that, we'll make a new ActionList asset - this time named OnResetObject. As with the last ActionList, this will also need a single GameObject parameter named Examined Item.
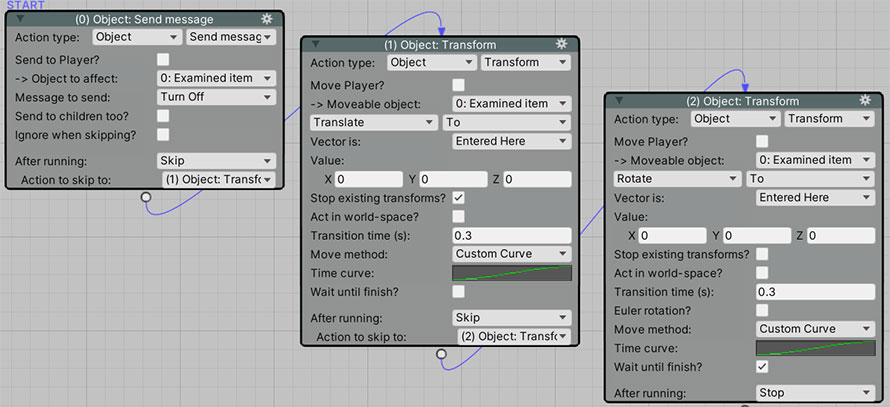
This ActionList will turn the Moveable_Drag back off, and also move it back to its original position and rotation. To do that, we just need to create these three Actions:
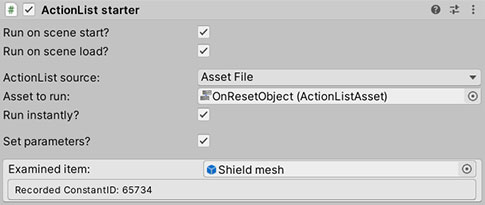
We'll want this ActionList to run whenever the scene begins or loads. Though we could refer to it in the Scene Manager's OnStart or OnLoad cutscene, we'll instead do it by attaching an ActionList starter component to the examine object directly. This way, all its logic can be placed in a prefab without having to refer to it elsewhere.
Set this component's ActionList source to Asset File, and the Asset to run to OnResetObject. Check both Run on scene start? and Run on scene load?, as well as Run instantly?. The transition time we set in the ActionList will still be used when we call it again later.
Finally, check Set parameters?, and assign itself (the object to examine) as the Examined item parameter:
This will now make sure that the examined object resets whenever the scene is loaded.
We'll finally need to make it so that we can exit 'Examine mode' by clicking on the Menu Button we made earlier. We previously made it so that clicking this Button runs the OnReturnObject ActionList asset - so lets set that up now.
As with the other lists, define a single GameObject parameter named Examined Item. This list will essentially do the opposite of OnExamineObject:
1) Hide the 'Examine mode' menu again
2) Allow the player to interact, move and save once more
3) Turn the Moveable_Drag component back off
4) Move the object we're examining back to its original position
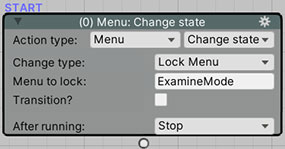
We'll begin by setting the first Action to Menu: Change state, and using it to lock the ExamineMode menu:
Next, we'll create another Engine: Manage systems Action that re-enables the systems we disabled earlier:
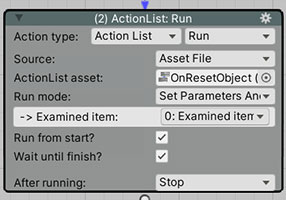
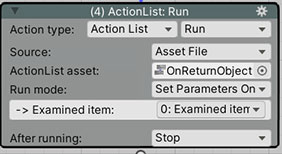
To reset the object's position, rotation, and Moveable_Drag state, we can again make use of our OnResetObject ActionList. Create an ActionList: Run Action, have it run this asset file. Set the Run mode to Set Parameters And Run, and set the Examined item parameter of OnResetObject to that of OnReturnObjects:
Finally, we just need a way of setting the value of OnReturnObject's parameter in the first place. We can do this by setting it at the end of OnExamineObject, since that also has its own Examined Item parameter that will be the same value.
Go back to OnExamineObject, and add a final ActionList: Run Action to transfer its parameter value to OnReturnObject. To make sure this doesn't actually run the ActionList, set the Run mode to Set Parameters Only:
Finally, we're done! We can click on the Hotspot to examine the item, and then click the "Return" button to put it back.
And as a bonus: because we relied on ActionList assets and parameters, this logic is easily transferrable. To demonstrate, make a prefab out of the Hotspot + Moveable_Drag objects, and then place more instances of it around the scene. You should find that each one works, without need to set any "local" fields.