With the Input element type, you can prompt the player to enter text or numbers - allowing for things like password puzzles. In this tutorial, we'll let the player enter their name - so that we can have NPCs call them by it as part of their dialogue.
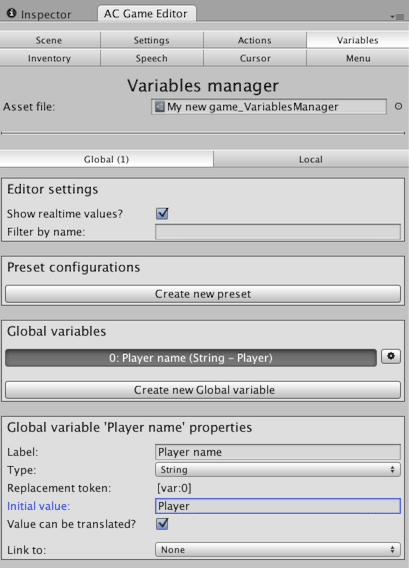
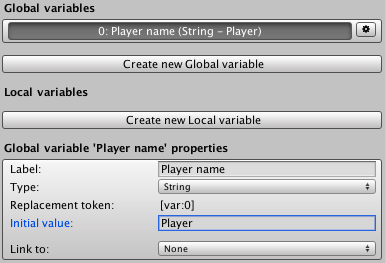
We'll store this name as a String variable, so we'll first need to define it. In the Variables Manager, click Create new Global variable. Change its Type to String, and rename it to "Player name", and enter in "Player" as the initial value.
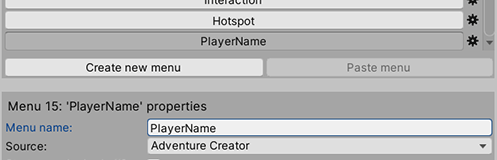
In the Menu Manager, create a new Menu and give it the name "PlayerName".
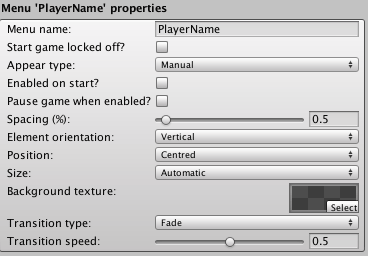
We'll make this Menu appear at a specific point in the game, so leave it's Appear type as Manual. This tutorial won't deal with styling the Menu, but to make things readable, set the Background texture to grey.png.
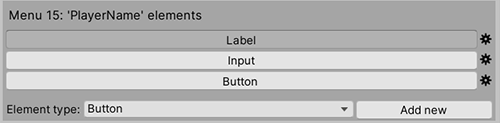
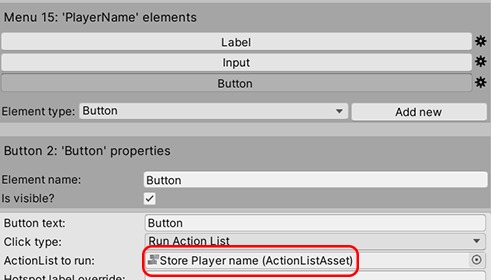
This Menu will consist of three Elements: a Label that prompts the player to enter their name, an Input box that they type in, and a Button to close the Menu afterwards. From the list of Element types, create a new Label, Input, and Button in turn.
Select the Label, and set its Label text to "Enter your name:". If the Menu's Size field is left as Automatic, the Menu will adjust it's size to fit the larger Label.
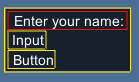
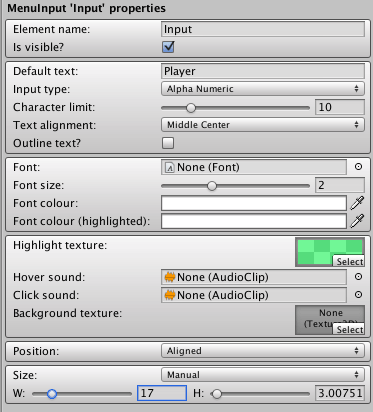
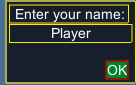
Select the Input box, and change the Default text to "Player", to match up with the string's default value. Set the Highlight texture to green.png, so that we can tell when the box is active.
We don't want the box to resize when the player enters their name, so set the Input's Size to Manual, and increase the width to line up with the Label above it.
Select the Button, and change it's Button text to "OK". As before, set it's Highlight texture to green.png. To separate it from the other elements, change it's Position to Absolute, and increase the X and Y values so that it sits apart from the others.
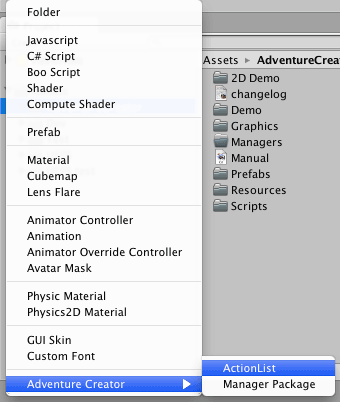
When we click the Button, we want the Menu to close, but we first want it to store the contents of the Input box as the value of our string Variable. To do this, we need to create an ActionList asset.
This can be done by choosing Create → Adventure Creator → ActionList in the Project window.
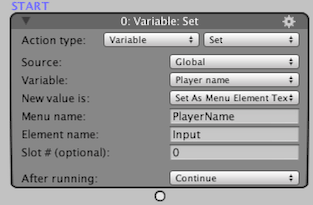
Name this asset "Store Player name". Inside this asset file, create the Variable: Set Action, and choose Player name as the Global Variable to affect. Change the Source to Set As Menu Element Text, and two more boxes will appear. Enter "PlayerName" as the Menu name, and "Input" as the Input element name. The Slot # field can be ignored, since the Input box is not a multi-slot element.
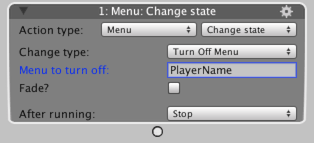
Next, create a Menu: Change state Action, set the Change type to Turn Off Menu, and enter "PlayerName" as the Menu to turn off.
We need to call this ActionList when the Button is clicked, so go back to the Menu Manager, set the Button's Click type to Run Action List, and set the ActionList to run as "Store Player name".
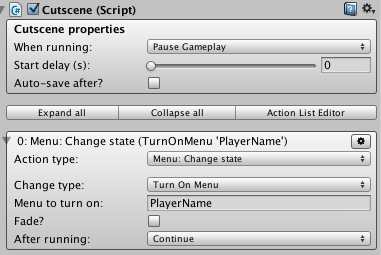
When we wish to turn on the Menu, we can use another Menu: Change state Action in any ActionList, such as this:
Any ActionList can be run at any time while the game is running and clicking Run now in their Inspector. This is a quick way to test ActionLists.
When called, the Menu will turn on, and when the Button is clicked, the contents of the Input box will be stored as the string Variable "Player name". We can display this name in a Menu Label if we set the Label's Label type to Variable. However, we can also insert this name into our game's dialogue by referencing the string Variable's ID number.
In the Variables Manager, each Variable has a replacement token, which - when used in speech Actions and Menu labels - will be replaced with the Variable's value. Here, the "Player name" Variable's token is [var:0].
Create a Dialogue: Play speech Action, and set it up as the following:
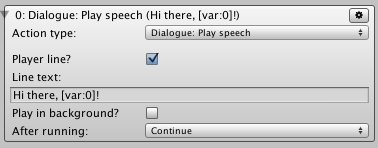
[var:0] is a token that references the "Player name" variable. So long as you call this Action after the player has entered their name, it will be replaced with the text they entered.