Actions are at the core of Adventure Creator. An Action is designed to perform a specific task, and Actions chained together in an ActionList can form Cutscenes, Interactions, and any logic sequence in a game.
Adventure Creator includes more than 50 Actions, but it's also possible to write your own Actions for custom behaviour.
In this tutorial, we'll write an Action that can adjust a Light component's Intensity value. Note that this tutorial is not a guide to scripting: just one on writing custom code that can be used by Adventure Creator.
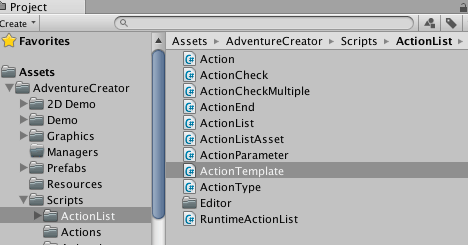
Each Action is contained within it's own script file. Rather than writing a new script from scratch, we can use the included template file as a basis. Within your asset folder, look for the script ActionTemplate.cs, found in AdventureCreator / Scripts / ActionList.
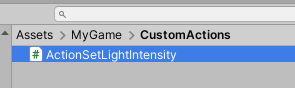
Duplicate the file, and rename the copy ActionSetLightIntensity. The Console window will display an error, but this will disappear once we edit the script. But first, move the new script file to a new folder, where all your custom Actions are to be stored.
Open the script file. To remove the Console error, we just have to rename the class name and constructor. Do this by replacing the instance of ActionTemplate with ActionSetLightIntensity on line 22. Save the script, and let Unity import it. The Console error will disappear.
[System.Serializable]
public class ActionSetLightIntensity: Action
{

	// Declare properties here
	public override ActionCategory Category { get { return ActionCategory.Custom; }}
	public override string Title { get { return "Template"; }}
	public override string Description { get { return "This is a blank Action template."; }}
We can replace the properties to give our own category, title, and description. Change them to read:
public override ActionCategory Category { get { return ActionCategory.Object; }}
public override string Title { get { return "Light intensity"; }}
public override string Description { get { return "Sets a Light's intensity value."; }}
We want this Action's GUI to have two fields: which Light to affect, and the new Intensity value. Declare the following two public variables:
// Declare variables here
public Light light;
public float intensity;
NOTE: These variables must be public so that they can be serialized (saved) properly by Unity.
The Action's GUI is written in the ShowGUI function. Inside this function, write the following code to expose the two variables in the editor:
light = (Light) EditorGUILayout.ObjectField ("Light:", light, typeof (Light), true);
intensity = EditorGUILayout.FloatField ("Intensity:", intensity);
The ShowGUI and SetLabel functions will only work inside UNITY_EDITOR define directives.
Lastly, we'll write the code that performs the gravity change when the Action is run. This is done within the Run function. This function returns a float, which will tell Adventure Creator how long to wait before anything else occurs. If zero is returned, the system will continue on. Since this Action will make an instantaneous change, we will do this. Modify the function to read the following:
override public float Run ()
{
	if (light)
	{
		light.intensity = intensity;
	}
	return 0f;
}
The Action's Skip function, which is used to override behaviour in the event the ActionList is skipped, can be removed.
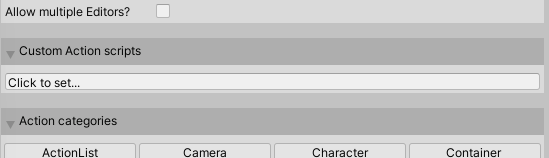
Our custom Action is now ready to be incorporated into Adventure Creator with the others. In the Game Editor window, find the Actions Manager.
We need to tell the system where our custom Action is stored. Under the Custom Action scripts panel, click the Click to set... button:
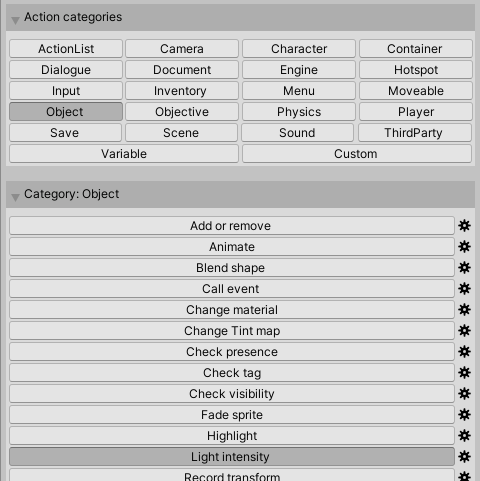
Navigate to your custom Action's directory and click Choose. You should now see your custom Action listed amongst the others in the "Object" category:
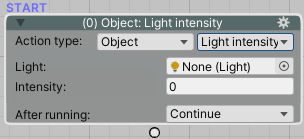
And the Action is now available in ActionLists:
The full script is as follows:
using UnityEngine;
using System.Collections.Generic;
#if UNITY_EDITOR
using UnityEditor;
#endif

namespace AC
{

	[System.Serializable]
	public class ActionSetLightIntensity : Action
	{

		public override ActionCategory Category { get { return ActionCategory.Object; }}
		public override string Title { get { return "Light intensity"; }}
		public override string Description { get { return "Sets a Light's intensity value."; }}

		public Light light;
		public float intensity;


		public override float Run ()
		{
			if (light)
			{
				light.intensity = intensity;
			}
			return 0f;
		}


		#if UNITY_EDITOR

		public override void ShowGUI ()
		{
			light = (Light) EditorGUILayout.ObjectField ("Light:", light, typeof (Light), true);
			intensity = EditorGUILayout.FloatField ("Intensity:", intensity);
		}

		#endif

	}

}