While Adventure Creator has an extensive Actions system for creating game logic without code, it's still entirely possible to script them if you prefer. In this tutorial, we'll script the result of clicking on a Hotspot entirely in code. Note that this isn't a tutorial on scripting in general, but rather how to use Adventure Creator's script functions in practice - and a knowledge of coding in C# is assumed. A full breakdown of AC's public functions and variables can be found in the Scripting guide.
We'll amend the 3D Demo so that the "Sword" Hotspots' interaction is scripted, rather than made in an ActionList. The 3D Demo can be loaded by choosing Adventure Creator → Getting started → Load 3D Demo from the top toolbar.
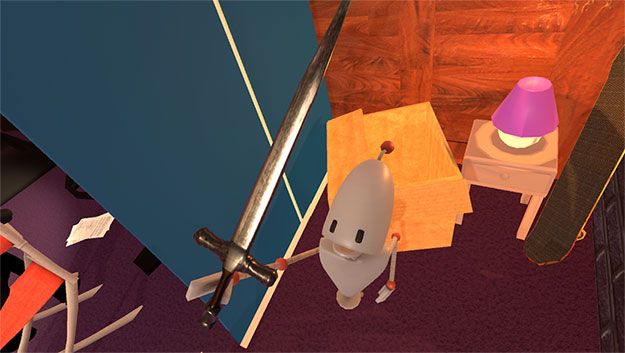
Run the scene - and after the opening cutscene - click on the Sword behind Brain, you'll see the player character, Tin Pot, pick it up, have an exchange with Brain, and add it to his inventory.
After ending the game, select the Sword Hotspot in your Hierarchy window, and change the Interaction source from In Scene to Custom Script.
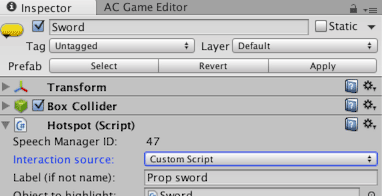
The fields within the Use interactions panel beneath will change, giving you a space to assign an Object to script:

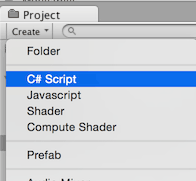
It's here that we'll call our custom script, which we'll now write. In your Project window, click Create → C# script and name it BasementInteractions.
Open up the script file. The first thing we must do is add Adventure Creator's namespace, so that we can make use of its functions. Insert the following at the very top:
using AC;Remove the Start and Update functions, and create a new public function called GetSword:
public void GetSword ()
{
	// Pick up the sword
}
This is the function that we'll call from our Hotspot. However, the interaction itself will involve a series of commands being called over time, so we'll do the actual scripting for it within a coroutine. Create a new private coroutine called GetSword_Coroutine, and call it from the GetSword function:
public void GetSword ()
{
	// Pick up the sword
	StartCoroutine (GetSword_Coroutine ());
}

private IEnumerator GetSword_Coroutine ()
{
	yield return null;
}
The interaction we're going to write can be broken up into the following steps:
- The player walks up to the sword
- The player faces the sword
- The player holds the sword mesh in his right hand
- The camera cuts to SwordCam1
- The player plays the Robot_TakeSword animation.
- The player says, "I have ... the power!"
- The camera moves to SwordCam2 over time
- The camera cuts to BrainCam1
- Brain says "Heh, your enthusiasm 'sword'."
- The sword mesh is removed from the player
- The player returns to playing his idle animation
- The camera cuts back to it's original position
- The sword is added to the player's inventory
- The sword Hotspot is disabled
- The 'Sword' dialogue option is added to the BrainConv conversation
- The 'Inventory' menu is unlocked
From this, we can determine which variables we will need to declare:
- The Marker to move the Player to
- The sword mesh
- The three cameras
- The NPC, Brain
- The sword Hotspot
- The conversation BrainConv
Declare variables for each of these at the top of your class. Make them all public, except for the player reference, which we'll assign automatically in our Start function:
public Marker walkToMarker;
public Transform swordMesh;
public GameCamera swordCam1;
public GameCamera swordCam2;
public GameCamera brainCam1;
public NPC brain;
public Hotspot swordHotspot;
public Conversation brainConv;
We have no need for a "Player" variable reference: we can access the Player at any time with KickStarter.player.
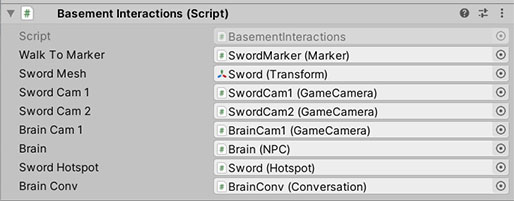
Save the script, and create a new Empty GameObject within your scene. Name it BasementInteractions, and attach this script to it as a component, and assign the values by dragging the correct scene objects into the fields:
We can now begin writing the interaction itself. Within the GetSword_Coroutine co-routine, we'll start by placing the game in Cutscene mode to prevent the player from being able to interact.
The StateHandler script is found on the PersistentEngine object, which is loaded when the game begins. A static reference to any component on this or the GameEngine object can be accessed within KickStarter:
// Place the game in a cutscene
KickStarter.stateHandler.EnforceCutsceneMode = true;
Be sure to remove the yield return null; line, since that was only a placeholder.
We'll make the Player move towards the walkToMarker GameObject. We can access the Player prefab, using the KickStarter.player variable. The Player prefab has a MoveToPoint function that we'll make use of:
// Make the player walk towards the Marker
KickStarter.player.MoveToPoint (walkToMarker.transform.position);
That function takes a Vector3, which we've set to the position of the Marker. We could have instead set the co-ordinates ourselves, but by referencing a Marker instead we can reposition the point in the scene wherever we like.
We'll want to wait until the player has finished moving before doing anything else. We can do this by checking the result of the Player script's IsMovingAlongPath() function:
while (KickStarter.player.IsMovingAlongPath ())
{
	yield return new WaitForFixedUpdate ();
}
Next, we'll make the player face the sword. We can access the Player prefab similarly, using the KickStarter.player variable. The Player script has a function called SetLookDirection that can be used to make him face a set direction:
// Make the player face the sword
Vector3 faceDirection = (swordMesh.position - KickStarter.player.transform.position).normalized;
KickStarter.player.SetLookDirection (faceDirection, false);
SetLookDirection's second argument determines whether or not the player turns instantly or not - setting it to 'false' ensures it occurs over time.
We'll want to wait until the player has finished turning before doing anything else. We can do this by checking the result of the Player script's IsTurning() function:
while (KickStarter.player.IsTurning ())
{
	yield return new WaitForFixedUpdate ();
}
Next, we'll put the sword in the player's hand. We'll do this by simple parenting. The player's right hand bone transform is stored in the Player script's rightHandBone variable:
// Hold the sword
swordMesh.parent = KickStarter.player.rightHandBone;
swordMesh.localPosition = Vector3.zero;
swordMesh.localEulerAngles = new Vector3 (0f, 0f, 90f);
Clearing the swords's position places it in the player's hand. Because of the sword mesh's orientation, the rotation must be set to (0,0,90) to make it sit correctly.
We can cut the camera to swordCam1 by telling the MainCamera to attach itself to it. If we do not supply a transition time, the effect will be instantaneous:
// Cut the camera
KickStarter.mainCamera.SetGameCamera (swordCam1);
We now want to play a custom animation on the player, which we can do by manipulating parameters already defined on his Animator. We'll first, however, need to turn him around. This is because the animation itself is reversed, so that the player will be facing towards the camera when it finishes.
// Animate the Player
KickStarter.player.SetLookDirection (-faceDirection, true);
KickStarter.player.GetAnimator ().SetBool ("SwordIsVisible", true);
KickStarter.player.GetAnimator ().SetTrigger ("TakeSword");
Next, we'll make the player say something. We can do this with the Dialog script's StartDialog function. Again, the Dialog script can be accessed in KickStarter:
// Player speaks
KickStarter.dialog.StartDialog (KickStarter.player, "I have ... the power!", true, 9);
The arguments in the function are as follows:
- The character to speak. If this is not set, the line will be treated as a narration
- The line's subtitle text
- Whether or not the line should be played in the background (optional).
- The speech line's ID, which is used to find audio speech files and lip-sync animation. If we left it out, the speech line would still display - just not with audio. Since this line was already created for the demo using Actions, we can make use of the line ID it generated.
Now we'll move the camera towards swordCam2. Like before, we'll tell the MainCamera to attach itself to it, but then supply some transition parameters. We'll also insert a brief pause beforehand:
// Move the camera upward
yield return new WaitForSeconds (1f);
KickStarter.mainCamera.SetGameCamera (swordCam2, 0.8f, MoveMethod.Smooth);
We'll then wait a little more, and snap-cut to Brain:
// Cut to Brain
yield return new WaitForSeconds (2f);
KickStarter.mainCamera.SetGameCamera (brainCam1);
We'll let Brain make a terrible, terrible pun - again making use of our pre-assigned line ID. This time, we'll wait until Brain has finished speaking before moving on:
// Brain speaks (I'm so, so sorry!)
yield return new WaitForSeconds (0.5f);
KickStarter.dialog.StartDialog (brain, "Heh, you're enthusiasm 'sword'.", false, 10);
while (brain.isTalking)
{
	yield return new WaitForFixedUpdate ();
}
yield return new WaitForSeconds (0.5f);
Note that Brain's mouth animation won't play automatically. This is because the mouth animation in the demo is keyframed by hand, so we'd have to play the animation manually. If the game was relying on lip-syncing for mouth movement, then it would move without the need for further code.
The visible portion of this interaction is now finished, so we now need to reset any visual effects we made. We'll start by placing the sword GameObject back inside the Hierarchy's SetGeometry folder, and moving it out of the player's view:
// Hide the sword
swordMesh.parent = GameObject.Find ("_SetGeometry").transform;
swordMesh.position = new Vector3 (0f, -20f, 0f);
Next, we'll cut the camera back to what it was when the interaction began. We can find out which camera was last used during gameplay with MainCamera's GetLastGameplayCamera() function:
// Cut to the last gameplay camera
_Camera lastGameplayCamera = KickStarter.mainCamera.GetLastGameplayCamera ();
KickStarter.mainCamera.SetGameCamera (lastGameplayCamera);
Now we can make the various gameplay changes that taking the sword will have. First, we'll add the sword to the inventory. Inventory items in Adventure Creator are referenced by their ID number, which is the number beside it's entry in the Inventory Manager. The ID number for the sword, for example, is zero:
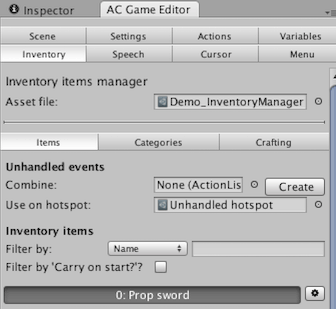
To add this item to the player's inventory, we'll use the RuntimeInventory script's Add function:
// Add the sword to the inventory
KickStarter.runtimeInventory.Add (0);
Next, we'll disable the 'Sword' Hotspot from so that it's no longer interactive:
// Disable the sword Hotspot
swordHotspot.TurnOff ();
We want the player to be able to talk to Brain about the sword. If you select BrainConv in the scene Hierarchy, you can see that this relates to dialogue option 4:
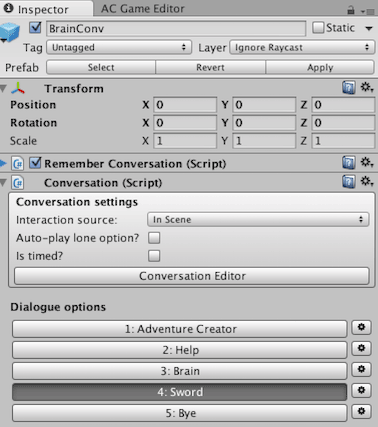
We can enable this by calling the Conversation's TurnOptionOn function:
// Enable the 'sword' dialogue option
brainConv.TurnOptionOn (4);
Next, we'll unlock the Inventory menu. Note that this is not normally necessary - but the scene's opening cutscene locks the Inventory to avoid cluttering the screen until it's needed. We can create a Menu variable by referring to the menu's title:
// Unlock the 'Inventory' menu
Menu inventoryMenu = PlayerMenus.GetMenuWithName ("Inventory");
inventoryMenu.isLocked = false;
Finally, we'll place the game in Normal mode, so that gameplay resumes:
// End the cutscene
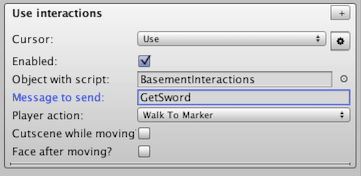
KickStarter.stateHandler.EnforceCutsceneMode = false;Our script is now complete - all we need to do now is call it's GetSword function when the Hotspot is clicked on by the player. In the Sword Hotspot's Inspector, set the Object with script to BasementInteractions, and the Message to send as GetSword:
And that's it! The finished script reads as follows:
using AC;
using UnityEngine;
using System.Collections;

public class BasementInteractions : MonoBehaviour
{

	public Marker walkToMarker;
	public Transform swordMesh;
	public GameCamera swordCam1;
	public GameCamera swordCam2;
	public GameCamera brainCam1;
	public NPC brain;
	public Hotspot swordHotspot;
	public Conversation brainConv;


	public void GetSword ()
	{
		// Pick up the sword
		StartCoroutine (GetSword_Coroutine ());
	}


	private IEnumerator GetSword_Coroutine ()
	{
		// Place the game in a cutscene
		KickStarter.stateHandler.EnforceCutsceneMode = true;

		// Make the player walk towards the Marker
		KickStarter.player.MoveToPoint (walkToMarker.transform.position);

		while (KickStarter.player.IsMovingAlongPath ())
		{
			yield return new WaitForFixedUpdate ();
		}

		// Make the player face the sword
		Vector3 faceDirection = (swordMesh.position - KickStarter.player.transform.position).normalized;
		KickStarter.player.SetLookDirection (faceDirection, false);

		while (KickStarter.player.IsTurning ())
		{
			yield return new WaitForFixedUpdate ();
		}

		// Hold the sword
		swordMesh.parent = KickStarter.player.rightHandBone;
		swordMesh.localPosition = Vector3.zero;
		swordMesh.localEulerAngles = new Vector3 (0f, 0f, 90f);

		// Cut the camera
		KickStarter.mainCamera.SetGameCamera (swordCam1);

		// Animate the Player
		KickStarter.player.SetLookDirection (-faceDirection, true);
		KickStarter.player.GetAnimator ().SetBool ("SwordIsVisible", true);
		KickStarter.player.GetAnimator ().SetTrigger ("TakeSword");

		// Player speaks
		KickStarter.dialog.StartDialog (KickStarter.player, "I have ... the power!", true, 9);

		// Move the camera upward
		yield return new WaitForSeconds (1f);
		KickStarter.mainCamera.SetGameCamera (swordCam2, 0.8f, MoveMethod.Smooth);

		// Cut to Brain
		yield return new WaitForSeconds (2f);
		KickStarter.mainCamera.SetGameCamera (brainCam1);

		// Brain speaks (I'm so, so sorry!)
		yield return new WaitForSeconds (0.5f);
		KickStarter.dialog.StartDialog (brain, "Heh, you're enthusiasm 'sword'.", false, 10);
		while (brain.isTalking)
		{
			yield return new WaitForFixedUpdate ();
		}
		yield return new WaitForSeconds (0.5f);

		// Hide the sword
		swordMesh.parent = GameObject.Find ("_SetGeometry").transform;
		swordMesh.position = new Vector3 (0f, -20f, 0f);

		// Cut to the last gameplay camera
		_Camera lastGameplayCamera = KickStarter.mainCamera.GetLastGameplayCamera ();
		KickStarter.mainCamera.SetGameCamera (lastGameplayCamera);

		// Add the sword to the inventory
		KickStarter.runtimeInventory.Add (0);

		// Disable the sword Hotspot
		swordHotspot.TurnOff ();

		// Enable the 'Sword' dialogue option
		brainConv.TurnOptionOn (4);

		// Unlock the 'Inventory' menu
		Menu inventoryMenu = PlayerMenus.GetMenuWithName ("Inventory");
		inventoryMenu.isLocked = false;

		// Hide the player's sword
		KickStarter.player.GetAnimator ().SetBool ("SwordIsVisible", true);

		// End the cutscene
		KickStarter.stateHandler.EnforceCutsceneMode = false;
	}

}
Again: descriptions of all of AC's public functions and variables can be found in the scripting guide.