Let's say we're making a 3D, third-person game where the camera is generally quite zoomed out. Close up sequences - where the camera focuses on a small portion of the scene, such as a cluttered desk or drawer - are a handy way of letting the player interact with things that would otherwise be hard to spot. We can do this by switching to a new GameCamera that lets us interact with such Hotspots, and then provide a means to switch back to our regular camera.
A Hotspot's Limit to Camera field is useful here, as it can force a Hotspot to only be interactive when a specific GameCamera is active, making it non-interactive outside of the close-up.
In the last tutorial, we introduced parameters - a handy way of recycling ActionLists for different situations. This time, we'll see how we can set parameter values in advance - and how this can help us exit a "close-up" sequence.
Let's start by creating a new Button that will appear while we're in a close-up - that we can click to exit the sequence. In the Menu Manager, add a new Menu and name it Exit Closeup. We'll want it to hide if we pause the game or enter a cutscene, so set its Appear type to During Gameplay. So that it doesn't turn on as soon as we start the game, though, check Start game locked off?:
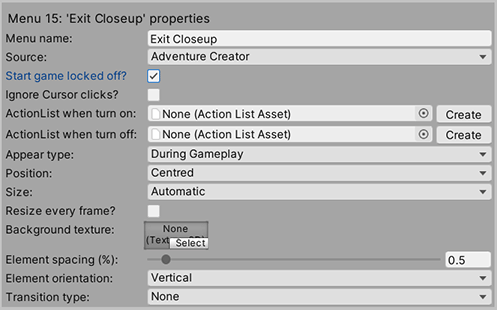
We can re-style it later using Unity UI, but for now leave its Source as Adventure Creator, and set its Position to Aligned, and Alignment to Lower Right. That'll cause its elements to appear in the lower-right corner.
Next we'll make the button itself. Choose Button from the list of Element types below, and click Add new. Name the button Back Button.
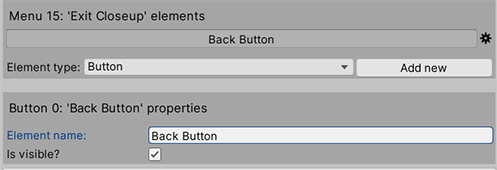
Rather than using a label for our button, let's give it a texture instead. Remove the text in the Button text box, and set it's Background texture to arrow-down, which is available in Assets/AdventureCreator/Graphics/Textures.
If your arrow is too large, you can reduce it by changing the button's Size to Manual, and reducing the slider values. Your button should look something like this:
![]()
We should give some visual feedback when the player's mouse hovers over it, so assign a Highlight texture as well. The green.png texture works well, and it's found in the same folder as the arrow.
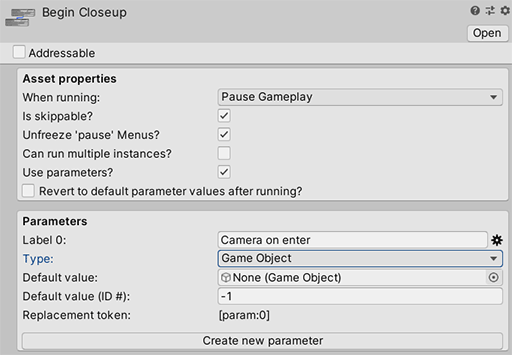
Now lets work on the "close up" sequence itself. Create a new ActionList asset (Create → Adventure Creator → ActionList) and name is Begin Closeup.
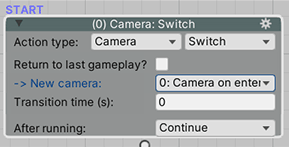
When we start such a sequence, we're going to want to switch to a new camera, prevent the Player from moving normally, and unlock the Menu we've just made. In this new ActionList, we can do this by creating Camera: Switch, Player: Constrain and Menu: Change state Actions respectively:
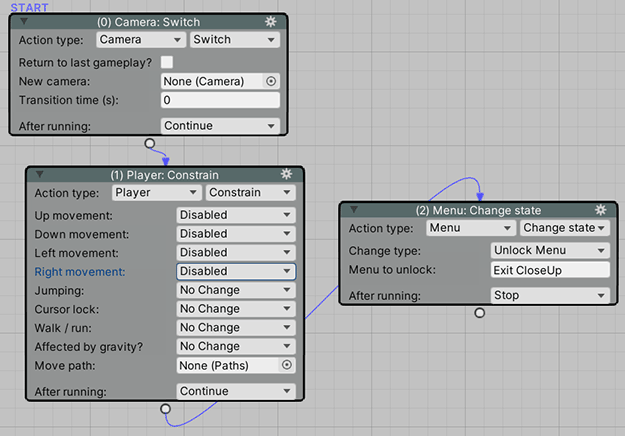
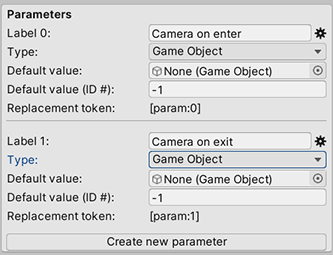
Because each close-up sequence will have its own camera, we'll override the New camera field with a parameter. In the ActionList assets list of properties, create a new Game Object parameter named Camera on enter:
We can then override the Camera: Switch Action's New camera field with this parameter:
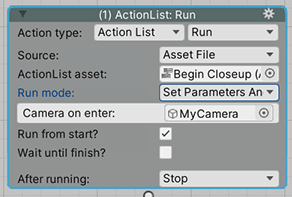
Whenever we want to begin a close-up sequence, we can now create a camera for it, and use the ActionList: Run Action to trigger it:
Now let's make another ActionList to exit the close-up. This'll be very similar to the last one we made, so we can duplicate Begin Closeup, rename it End Closeup, and adjust the parameter name and Actions as follows:
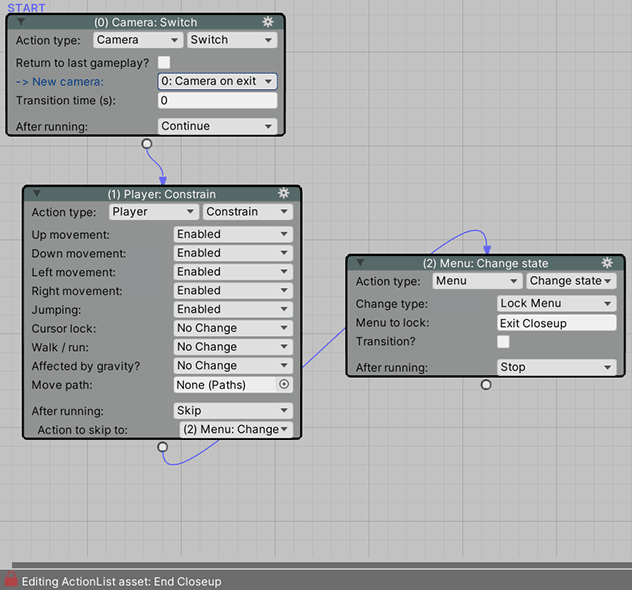
Here, we just changed the parameter's name to Camera on exit, made the Player: Constrain Action allow player movement, and the Menu: Change state Action lock the menu instead.
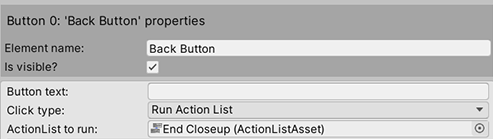
We can run this ActionList whenever we click the Button by assigning it in the Button's ActionList to run field:
But what about this ActionLists Camera on exit parameter? This parameter should be set to the camera that we want to return to once the close-up is over - but we want to set this at the time the close-up begins.
We can do this by creating this same parameter in our Begin Closeup ActionList, and transfer its value over to End Closeup. In Begin Closeup, create another GameObject parameter named Camera on exit:
Our ActionList: Run Action will now update with this parameter - so that we can set it at the time the sequence begins:
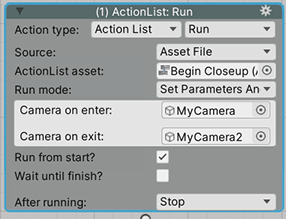
Now, all we need to do is transfer this parameter from Begin Closeup to End Closeup. We can do this by adding another ActionList: Run Action - only this time, we'll set the Run mode to Set Parameters Only:
![]()
Then, set the Camera on exit field to Begin Closeup's parameter of the same name. That way, when the close-up begins, the End Closeup ActionList will have its parameter set up in advance of us clicking the button.